Thursday 31 October 2013

How To Write a Craft Tutorial for Your Blog: Taking Notes

My series of posts on writing craft tutorials continues today.

So, you've decided what you're going to make for your tutorial and (if you need to) you've made a prototype to test out your design. Now it's time to start making!

Taking Notes.


As you make and photograph the project, it's important to take notes as you go along. It's very easy to forget exactly how you did a certain step when you come to write a tutorial, so taking detailed notes will help you write accurate instructions.

When I write my instructions I leave a space at the top of the page to write down all the materials and tools I'm using, and add each one to the list as I use them. Remember to include information like the size and colour of your materials - e.g. write "blue sewing thread" not just "thread", and if you're using a specific type of fabric or glue, or a particular size of bead, etc, then write that down too.

Sewing Threads

Then I write a quick list of the steps my project is going to involve, to help me plan out how many photos I'm going to take - e.g. for a bird brooch: 1. Cut out pieces, 2. Sew wings, 3. Sew eyes & beak, 3. Add stitching or sequins, 4. Add booch clasp, 5. Sew together. 

Then as I make the project (pausing to take photos during or after each step) I write down everything I'm doing as numbered steps, in the order that I do it. If I notice that one step is getting quite long, I might take an extra photo and split it into two steps.

Think About The Details.


As you make the project, think about what you're doing during each step and how you would describe it to someone who can't see what you're doing. Your tutorial will have photos so you can say things like "sew the wings in position using running stitch" or "sew on the eyes with whip stitch in matching sewing thread" and people will be able to see where on the bird the wings and eyes need to be sewn... so the photos do a lot of the work for you. But thinking about how to describe something in words can really help you notice details that you should include in your instructions.

Example #1: when you sew a brooch clasp on the back of a felt brooch, writing "Turn over the back piece of the brooch. Use a double thickness of matching sewing thread to sew on the brooch clasp." makes for better instructions than just "Add the brooch clasp". You know you always turn over the backing piece and always use a double thickness of thread that matches your felt, but the person reading your instructions might not.

Adding a brooch clasp

Example #2: when stuffing something (e.g. a felt owl) don't just write "Sew the owl together, stuff it then sew up the gap." What stitch have you used to sew it together, and what colour thread? What size gap have you left? What kind of stuffing are you using and did you use your fingers to stuff it or did you use a tool like a pencil? Did you stuff it lightly or firmly? (if you stuff it too much, will it distort the shape?) Did you have to take extra care to get the stuffing into the ears?

Sewing up a stuffed felt owl


Also write down any tips or extra information that you'd like to include that people might find helpful. Are you using any special techniques that you need to describe or link to online tutorials for? Could people use a different material for this or did you choose this material for a special reason? Did you make a mistake (or nearly make a mistake) when doing the tutorial that you should warn people about? If you're using glue or paint, how long do you need to leave it to dry? If you're designing a project to make with kids, are there any tricky steps where the adult needs to take charge? Are one of these steps really messy, do people need to wear an apron or gloves? Etc etc.

Something to particularly look out for is: is there a step coming up later that affects what you're doing now? If so, make sure you mention this now and not later! People will follow your instructions step by step - they won't know there's something they need to bear in mind for later unless you tell them.

For example: if you've positioned your embroidered motif in the centre of your fabric because you need extra fabric around the edge for framing the design later.... or if you've stuck a shape onto a card slightly above centre because you need space to write "Happy Birthday!" underneath it later... or if you've taken care not to pull your stitches too tight when sewing something together because you need to flatten out the seam later... say so!

You don't always need to include lots of detail in your instructions (some steps - and some entire projects - will be very simple!) but thinking about the details of how you're making something will help you spot the steps that need a bit of extra info to help people replicate your project.  

Next time: Photos and Illustrations
Wednesday 30 October 2013

How To Write a Craft Tutorial for Your Blog: Getting Started

Over the next few weeks I'm going to be sharing some tips for writing craft tutorials. I started writing a blog post with a few quick tips and it turned out that I had so much I wanted to talk about that I've written a whole series of posts instead!

I wrote my first craft tutorial about five years ago - a "how to" for some felt flower hair pins templates. That first tutorial was very basic and didn't have any step by step photos or printable templates for the flowers, but people seemed to like it and I enjoyed writing it so I wrote some more.

Over the years I've gradually improved my tutorial-writing and have shared dozens of free tutorials here on my blog, had projects published in books and magazines and written two craft books... and I've picked up lots of tutorial-writing tips and tricks along the way. If you're just starting out writing tutorials on your blog or you've never tried writing one before I hope you'll find this series helpful. Do let me know if you have any questions :)

Some of my free craft tutorials


Why Write A Tutorial?


Posting free tutorials on your blog can be a great way to get some extra blog traffic or to get your blog noticed if you're just starting out - a big chunk of my blog's traffic comes from people searching from tutorials, or following links from Pinterest or from blogs that have featured my projects. It's also also a lovely way to share your crafting with your readers. Instead of just reading about you making something, they can make it too!

Writing a tutorial is also a fun creative challenge that can help you flex your designing and writing muscles, and hearing from someone that they've used your tutorial to make something is a really, really awesome feeling.

Before you Begin.


First of all, you need to decide what your tutorial is going to be for. If you've never written a tutorial before it's probably best to start with a simple project that doesn't involve lots of steps or complicated techniques. You can share some more ambitious projects later if you want to! 

Simple tutorials can actually end up being the most popular - people love beginner-friendly sewing projects or quick, crafty ideas that they can easily try at home. Remember: just because you know how to make something, it doesn't mean that everyone else does or that they would think of the idea.

One of my most popular tutorials at the moment is the felt Christmas tree ornament tutorial I shared last winter - it's a very simple pattern, but lots of fun to make (especially with kids who are just learning to sew). 


If you make crafty stuff to sell, you might be worried that writing a free tutorial means giving away all your trade secrets but you don't have to share a tutorial for what you sell. You could use an old design you no longer sell any more or an idea you had that didn't make financial sense as a product or that didn't fit in well with the rest of your range. If you discover you enjoy writing tutorials, your free projects can even become a "portfolio" of work you can use to try and get paid work writing craft tutorials.

Tutorial writing can also be a great way to let off some creative steam and make something that's just for fun and not for work - this is something I've always loved about my gift-wrapping tutorials, they're so different to the felt designs I've sold in my shops. Working on fun free tutorials have definitely helped me stay in love with crafting at times when I've felt a bit burned out by making the same thing over and over, or when my work schedule has been full of the boring stuff like doing my accounts.

My first tutorials were "how tos" for making things I was already making for myself and as gifts - felt flowers I wore in my hair for a fancy evening out, lavender sachets I made friends and neighbours, decorations I made to cheer up my flat at Christmas, etc. This was a great way for me to try out writing tutorials, as I was making the projects anyway!

Lavender Sachets

If you don't know what to make, try sparking some inspiration by focusing on an occasion or a season (make a Christmas decoration or something inspired by Autumn leaves), a material (make something from felt, or think of a way to re-use the packaging from something in a crafty way), or something you love that you'd like to celebrate with a pattern (your favourite flower or animal, or your favourite book).

Whatever you decide to make for your tutorial, remember that if you're interested in making it then someone else out there will be interested too. This is the brilliant thing about the internet!

Preparing to Make Your Project.


If you're writing a tutorial about something you've never made before, you might find it helpful to make a prototype. This will help you test that your templates / pattern / techniques all work how you expect they will, so you don't waste time photographing something that doesn't work out or waste the good-for-photo-taking daylight working out how to make the next part of the project.

It also doesn't hurt to have an extra item to use in your photos of the finished project - and if you make the prototype slightly different from the finished item (e.g. using slightly different fabric, or decorating it with beads instead of sequins) it's a great way to show how the project can be customised.

For your tutorial, you will be making / producing:
  • A finished item
  • A list of the materials and tools you used to make it
  • Step by step instructions, plus any special tips for working with the materials
  • Photos of the finished item
  • Step by step photos, or (if your project is very simple) several photos of the finished item so people can see how it's put together
  • And (if needed) a template or pattern that people can print out

Next time: Taking Notes

P.S. You might also like this post about How To Design a Felt Brooch

Tuesday 29 October 2013

A Special Weekend & A Very Cute Calendar

My baby sister got married at the weekend! Such a lovely, happy day in a beautiful place.


I am now busy catching up with emails, etc. I always try really hard to keep on top of my inbox from day to day... coming back to it after a few days off work can be a little overwhelming as it fills up so quickly, but I'm getting there slowly.

So, while I am replying to emails and getting stuck in to this week's To Do list, here's something that has nothing to do with crafting but was just too cute not to share: a cat calendar with a literary theme!


Each month of the "Puss in Books" calendar (created by Sarah, who blogs at Yes & Yes) features a kitty in a costume plus matching literary quotation - e.g. a cat in a white rabbit costume and a quotation from Alice in Wonderland.


The calendar is $19 (including shipping, even for international orders) and Sarah is donating $1 from each pre-ordered copy to a cat shelter. Read more about the calendar and pre-order your copy HERE.

Monday 28 October 2013

Felt & Fabric Brooches Tutorial for Tesco Living

Fancy a free tutorial for making some fun felt brooches?

If you visit Tesco Living you'll find a tutorial written by yours truly on how to make these felt and fabric brooches....


The brooches are quick and easy to sew, and are a great way to use up pretty scraps of fabric. Choose from a flower, two hearts and a bow (which you can wear as a fun, faux bow-tie if you want!).

You can find the tutorial HERE.

Sunday 27 October 2013

Book Review: Remarkable Rugs

Today I'm reviewing a book that's a bit different from the usual crafty books I tend to feature - it's not a book with tutorials, but a "coffee table" type book featuring the work of textile artist Phoebe Hart.


Remarkable Rugs: The Inspirational Art of Phoebe Hart by Harriet Hart and Caroline Clifton-Mogg features 42 of Phoebe's hand stitched designs. The book is a lovely hardback that's jam-packed with photos of her gorgeous rugs and wall hangings.

I have to admit that I'd never heard of Phoebe Hart before I was asked to review this book, but I'm delighted to have discovered her work - she was a very talented lady!


There's a short introduction which covers Phoebe's life, work and techniques. Then the designs are presented in themed chapters: Islands of the sun (inspired by her time living in the Caribbean), On the wing (lots of birds), A Peaceable Bestiary (assorted animals), Flowery Work (lots of florals), The Fruitful Harvest (seasonal fruit and vegetables), The House Beautiful (homes and their gardens, from cottages to mansions to farms) and In Celebration (designs celebrating birthdays, anniversaries, etc).


There's a photo of each piece, with a short description of the design. Then there's a full page photo (or a series of full page photos) showing close-ups of the design. When there's a series of close-up photos these tend to each be at a different scale - showing whole sections or "zoomed in" to show the really fine detail.

This shell design is one of my favourites:


I also adore this kitty! What a character.


Phoebe Hart's designs are intricate and quirky and quite beautiful. Looking at the photos of a whole design you admire it almost like you would a painting - the overall composition, the choice of colours, etc.


But the close-up photos are where you see the full beauty of the pieces as textiles and how much life they have in them as well as (of course) getting to see how Phoebe has constructed the different motifs.  


This is a gorgeous book that left me feeling the way I do when I've visited a great exhibition. If you're interested in textiles and, (like me), looking at these pictures made you go "oooh" I think you'll find this a really inspiring addition to your bookshelf.

Remarkable Rugs is published by Double-Barrelled Books. RRP £25. It's available from Amazon UK, Amazon USA, The Book Depository and many other bookshops.

[Disclaimer: the publisher sent me a review copy of this book. The Amazon & Book Depository links in this post are affiliate links]

Saturday 26 October 2013

Some Cross Stitch in Progress & A Look Inside My Book

I have finally made a start on stitching the "stop faffing about" sampler I designed back in the spring.


I've been feeling quite tired in the evenings lately and haven't been able to really focus on any of the crafty projects I've had in progress. It's been quite frustrating not having any crafting to do while watching TV, so I thought it would be good to make a start on something super-simple that even my sleepy brain can manage.

I find it very amusing that the motto on this sampler is all about NOT procrastinating and yet here I am, taking months and months to get around to stitching it!


Fancy stitching this sampler yourself? You can find this chart (plus a version with a very mild cuss word) HERE.

In other news... you can now "Look Inside" my new book, Super-Cute Felt Animals, over on Amazon. This feature isn't quite as good as being able to flick through a book in a real bookshop but it's still very useful when you're shopping for craft books!


P.S. those of you who follow my blog via RSS feed or email updates - apologies if you've seen this post before! I accidentally hit the wrong button when working on it. Told you I was feeling tired at the moment! :)

Friday 25 October 2013

My Sky Blanket... Finally Finished!

Remember my sky blanket? After finishing it last month I have finally taken some nice photos of it to share with you guys. Hurrah!


(Big thanks to my parents for holding it up for that photo!)


The blanket was inspired by / based on Lea Redmond's awesome Sky Scarf project where you knit a row of a scarf each day for a year, based on the weather that day.


I loved this idea but decided to knit a blanket instead so I'd end up with a cosy blanket I could use year after year instead of a scarf that would be fun to knit but which (being honest with myself) I knew I'd never wear. I also thought knitting blanket squares would make for a more portable project than having to carry a half-finished scarf around with me for months.

I started on 1st January 2012, and knitted a square for 360 days.


The plan was to sew the blanket together gradually (each week or so) as I knitted more squares but I fell a little behind at the end of the year when I was busy with a) the Christmas season in my shops and b) working on my new book. Then this year I just got a bit of project fatigue and couldn't face sewing in all those yarn ends! (So very many ends)  .


I got there eventually though and I cannot even begin to tell you how thrilled I am with how this project has turned out. I think the finished blanket looks gorgeous and I am still totally in love with the concept - a blanket that's a record of (almost) a year of the weather! It makes me happy every time I look at it.

Here are some snaps of the blanket as it grew...

February:

  
April:


June:


August:


Early November:


And here it is, finished! Woohoo!


I arranged the squares running from left to right in rows, like a calendar. In the above photo, the top left square is day #1 and the bottom right square is day #360.


I love the mix of these colours together! Because each square is knitted with two strands of double-knit yarn, the finished blanket is thick and very cosy. 


The back looks like this:


Oh, and there's a pretty blue and white button sewn onto one corner so I'll always be able to tell where the year of squares begins. 


You can find instructions for knitting a sky scarf here but if you want to knit a blanket just like mine, I'll be sharing all the info about how I made my blanket in a "how to" post in a week or two :)

Update: find out how to knit your own sky blanket HERE.

Thursday 24 October 2013

Book Review: Hoop-la!

Today I'm taking a look at Kirsty Neale's new book, Hoop-La!: 100 things to do with embroidery hoops.

Kirsty used to buy felt from me (I shared some of her adorable finger puppets in a Show & Tell post a couple of years ago) and I've been a fan of her work ever since. I've been really looking forward to her book coming out, and was delighted when she asked me to take part in the blog tour for it.
 
Hoop-La! starts with some useful tips for working with embroidery hoops, and a great selection of ideas for decorating the hoops themselves - painting them, adding washi tape, stitching a crochet edging, etc.

Then it's on to the projects... all 100 of them! Most of the projects take up a page or half a page of the book, with a photo of the finished piece and step by step instructions. Many of the projects also include a helpful "top tip".


The designs range from simple to detailed, and from stylish to incredibly cute. The motifs include flowers, fruit, dishes, mushrooms, mixtapes, animals, people, birds, and geometric designs. There's also a typewriter, a chandelier, a little house, a paper plane... and much more.


There are also lots of different crafts and techniques covered in the book, including applique, embroidery, cross stitch, screenprinting, crochet, patchwork, stencilling, making sunprints, reverse applique, sashiko, crewel work, and beading.

Some of the hoops are used to display special pieces of fabric, embroidered and printed designs, or interesting objects. Others are used to create quirky wall art - like an appliqued giraffe that's spread across 3 small hoops, and a gorgeous diorama framed in a hoop. And several are used to make "practical" items, like a noughts and crosses game, a chalkboard, a mini photo album or a jewellery holder.


Then at the back of the book there's a comprehensive techniques section with lots of clear diagrams and photos. 

You can check out lots of the designs from the book in this cute little video (if the video isn't showing up for you, click here to watch it).


There's a really great mix of projects in this book! The designs themselves are lots of fun, and the techniques and ideas can also be easily adapted to make your own embroidery hoop projects. Hoop-La! is absolutely on my "to buy" list and I'm sure I'll be getting it off my shelves for many projects in the years to come. 

You can visit Kirsty's blog HERE and follow along with the blog tour HERE.

Hoop-La! is published by David & Charles. RRP £14.99. It's available from Amazon UK, Amazon USA, Stitch Craft Create, The Book Depository and many other bookshops.

[Disclaimer: David & Charles sent me a free PDF copy of this book to review. The Amazon & Book Depository links in this post are affiliate links]

Wednesday 23 October 2013

Review: Crafty Magazine

Today I'm reviewing an issue of Crafty Magazine.

Rather shamefully, this post has been sitting half-finished my my drafts folder for so long (thanks to me being busy with some other projects) that the issue I'm reviewing is no longer in newsagents... but you can still buy copies from their online shop, and hopefully this review will give you a feel for what the magazine is like overall even if you can't get your hands on this specific issue. Anyway, enough about me being a bad blogger and on to the review...


Issue #6 of Crafty Magazine has a cute knitted fox bag on the cover, which is inspired by Roald Dahl's Fantastic Mr Fox. I can't get enough of woodland animals at the moment and this bag is pretty adorable but sadly I think it might be a little bit beyond my own knitting skill level (for the moment, at least!).

Crafty starts with "What's New" - a few pages featuring things like cool new fabric, fun sewing-themed gifts, lovely handmade products and upcoming events and exhibitions with a crafty theme. 


There's also an events page with things coming up in October (remember, this issue came out a while ago!) around the UK, and a couple of pages of "Good Reads" which includes reviews of some new craft books but also an interview with one of the authors.

There are 26 "Makes" in this issue, covering a wide mix of different crafts: needlefelting, knitting, crochet, sewing, embroidery, jewellery-making, paper-crafting, cross-stitching, dip-dyeing, cooking, and more! All the projects are fun, modern and colourful (you guys know how much I love a nice bit of colour). Some are extracts from craft books while others have been specially designed for the magazine, but the standard of photography is high throughout. 

Rather predictably, the stitchy projects are the ones that appeal to me the most. I especially love these craft-themed merit badges...


... and this paisley embroidery, although don't know that I'd have the confidence to wear a shirt like this! I'd love to embroider the pattern on something like a cushion though.


All the projects have step by step instructions - some are more detailed, with step by step pics and/or stitch guides, and others are quicker "how tos" like these plant markers made from old forks and broken plates. 


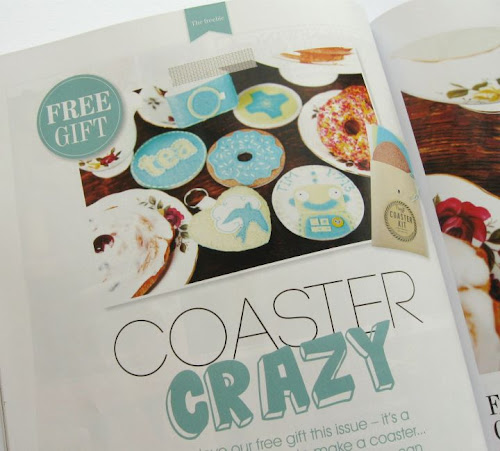
This issue of Crafty comes with a free coaster-making kit.

Sadly, this kit includes that special kind of felt (stiff and paper thin) that I have only ever encountered in free-on-the-cover-of-magazines projects and which I would absolutely replace with felt from my own stash were I to make any of the coaster projects in the magazine.

But! I would absolutely prefer to buy a magazine where the freebie kit materials aren't top quality (and thus, are more affordable for the publisher to provide) because I wouldn't want the cover price to be pushed up just for the sake of a free kit I may not get round to making anyway. Also, the coaster is self-adhesive (you peel off a layer of plastic to reveal the sticky surface, like you do with double-sided tape) which is really great.


(NB the felt was flat when it came out of the pack, I managed to crease it before taking the photo)

The instructions that go along with the kit are really great! There are four different, fun designs included that you could make with the kit (plus two more availablle on Crafty's website) - so you've got lots of options for things you can make from the free supplies but also have 4+ projects you can make from felt in the future.

Another great thing about having several projects you can make from the same supplies is that you could buy a pack of plain coasters, some sheets of felt and some embroidery threads in these colours and make several different designs from them... instead of having to invest supplies to make one thing and then having lots left over.

 
The only real problem with the coaster projects is the templates which say "blow up to desired size". I don't mind enlarging templates (especially from a magazine so crammed with stuff as this one is) but it's always so much more helpful to see "blow up to X% or to desired size", where X will make templates big enough to make the item at the size shown in the photos. Also in the case of the coaster templates, the templates need to be exactly the same size as your coaster so your felt design will fit neatly on top, which is going to be tricky to achieve without being told what % to enlarge them by.

As well as craft projects, this issue also includes a sewing column written by Tilly from the Great British Sewing Bee, an interview with a feltmaker, and a lovely home tour...


... plus articles about The Colour Run (which looks so much fun that it almost makes me want to take up running just so I can take part in a future event) and super cool town Hebden Bridge.


There's also "The Crafty Guide to Business" which this issue focused on offering bespoke orders and a feature on craft bloggers who went from blogging to writing craft books.


One thing I really like about the content across the magazine is how many of the tutorials and other features have a "sidebar" with three things along the same theme. For example, alongside the paisley embroidery project there are three fabrics that feature paisley motifs, alongside the plant labels are three more plant label ideas from craft blogs (with the blog addresses included), alongside the needlefelting tutorial is info about three courses/books so you can learn more about needlefelting, and alongside the fox bag tutorial there are three fox-y shopping ideas.


Overall, this is a lovely magazine! It's jam-packed with content, with a really broad mix of crafty projects and a good balance between stuff to make and features to read... and it feels fresh and up-to-date, like a great blog.

Issue 7 (out now) looks great and seems to contain even more makes!


I especially love the look of this cross stitch lampshade project.


Crafty Magazine is £4.99 per issue, or you can subscribe here.  

[Disclaimer: the nice folks at Crafty Magazine sent me a free review copy of issue 6. I'm also currently working on a project for a future issue of the magazine but you guys know I'm always honest in my reviews!]